


Thermal pads, also commonly known as thermal conductive silicone sheets, are widely used in various electronic devices, primarily filling the gaps between electronic components and heat sinks or device housings. With their excellent flexibility, compressibility, self-adhesion, and thermal conductivity, they completely eliminate air between contact surfaces, allowing components to adhere tightly to the heat dissipation structure, significantly improving heat transfer efficiency and optimizing device cooling.
While the installation of thermal pads is not complicated, the details of the operation directly determine their thermal conductivity and sealing performance. Improper operation can easily lead to problems such as loose adhesion, air bubbles, and pad deformation, seriously affecting heat dissipation. Below is a detailed introduction to the standardized usage steps and operating specifications for thermal pads.
I. Clean the Contact Surfaces to Ensure a Solid Fit
Before installation, thoroughly clean the contact surfaces of electronic components and heat sinks, removing dust, oil, impurities, residual adhesive, and other contaminants. The cleanliness of the contact surface is crucial for ensuring the self-adhesion, sealing, and thermal conductivity of thermal pads. Any stains will lead to poor pad adhesion, thermal breakage, and decreased adhesion, significantly reducing heat dissipation performance.
II. Properly Handle and Place Pads to Avoid Deformation and Damage.
When handling large-area thermal pads, hold the pad in the middle and lift it steadily. Pulling or lifting from the edges will cause uneven stress on the pad, resulting in stretching, wrinkling, and deformation. This not only affects the subsequent bonding accuracy but can also directly damage the pad structure, rendering it unusable. Small-sized pads are less affected by stress and do not have strict handling requirements. Minimize direct contact with the pad's contact surface with bare hands throughout the process to avoid contaminating the pad with dirt and grease from your hands.
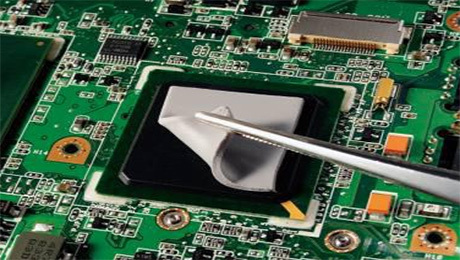
III. Peel Off the Protective Film on One Side Only to Protect Pad Performance.
After placing the pad steadily, hold it with one hand and slowly peel off the protective film on one side. Never peel off both protective films simultaneously, as this easily attracts dust and debris, and also diminishes the pad's adhesive properties, damaging the thermal interface performance. Throughout the process, carefully control the contact area to maximize the protection of the effective bonding surface of the pad.
IV. Precise Alignment and Bonding to Eliminate Residual Air Bubbles
After removing the protective film, precisely align the thermal pad with the position of the electronic component to be bonded, and slowly and steadily place it down. Then, using a flat, rigid adhesive sheet, push and press the pad from one side to the other at a uniform speed to gradually expel air from the contact surface, avoiding residual air bubbles. Air bubbles can block heat transfer, creating heat dissipation dead zones, a common cause of poor heat dissipation.
V. Air Bubble Removal and Gentle Repair Without Damage
If air bubbles remain inside the pad after bonding, gently lift one end of the pad, realign it, and push and expel the air at a uniform speed; alternatively, use a rigid plastic sheet to gently scrape and press the air bubble area to completely remove the air. During operation, be sure to use gentle and even pressure; do not press or scrape forcefully to prevent deformation, breakage, or stretching of the pad, causing irreversible damage.
VI. Remove the other protective film and install the heat dissipation structure.
After completely removing air bubbles and ensuring the gasket is flat and evenly adhered, gently peel off the protective film on the other side of the gasket. Control the force during this process to avoid damaging the gasket or causing it to shift and create new air bubbles. Then, precisely align and install the heat sink and other heat dissipation components.
VII. Apply pressure to solidify the fit.
After all installation is complete, apply moderate pressure evenly to the heat sink and let it stand for a period of time. This pressure solidifies the gasket, ensuring it fully fits the gaps and compacts the interface, completely eliminating any tiny gaps and guaranteeing a firm bond, maximizing its heat dissipation performance.
The heat dissipation effect of the thermal pad depends primarily on the tightness and integrity of the fit. Every installation detail is crucial. Strictly following the above specifications will maximize the preservation of the gasket's thermal conductivity and sealing performance, ensuring stable heat dissipation for electronic equipment. For any questions regarding adhesives or thermally conductive materials, please leave a message for consultation.